
The Vibefam–ClassPass integration lets you fill empty class spots by making them bookable to ClassPass users, while Vibefam manages capacity across both platforms in real time. The sync works both ways: a ClassPass booking instantly updates your Vibefam class, and a Vibefam booking reduces availability on ClassPass.
- How the spot sharing works
- Step 1: Request the integration from ClassPass
- Step 2: Enable locations and send your credentials
- Step 3: Allocate ClassPass spots on your classes ← the step studios most often get wrong
- Bulk-enabling existing classes
- A note on SmartSpot
You need a ClassPass account, and your studio must be a listed ClassPass partner, to integrate. You can enable or disable the integration at any time.
How spot sharing works
You decide how much of each class ClassPass can sell. Vibefam keeps the two sides in balance automatically:
A class has 20 spots in Vibefam. You send 10 to ClassPass. ClassPass can book at most 10 of them; your own members can fill all 20. If your Vibefam members book 15, ClassPass's available spots drop to 5.
So ClassPass never oversells your class — the shared pool shrinks as either side books.
Key point: ClassPass spots are drawn from your existing Vibefam class capacity — no additional seats are created. The total number of bookable spots never exceeds the class capacity you set in Vibefam.
Step 1: Request the integration from ClassPass

- Make sure your studio is a listed ClassPass partner.
- Submit a request via the ClassPass Partner Support form. When prompted, select "I need help with my third-party schedule integrator", then "I'm switching my scheduling platform."
- ClassPass typically responds within 3 business days.
Step 2: Enable locations and send your credentials
- In Vibefam, go to Configure → ClassPass Integration.
- Under Choose which locations you want to enable for ClassPass, enable each location you want live on ClassPass. Each has its own Enable / Disable control, so you can run ClassPass at some venues and not others.

- Copy the credentials message in the grey box at the bottom — it contains your Partner ID and the Venue IDs for each enabled location — and send it to your ClassPass account manager.
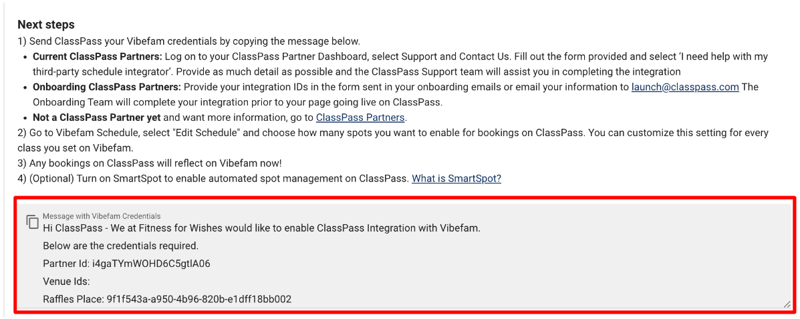
- Tell ClassPass your desired migration/go-live date, and they handle the rest.
Confirm the integration status shows active, and that every location you intend to list shows a green tick, before sending your credentials.
Step 3: Allocate ClassPass spots on your classes
This is the step studios most often misunderstand — read it carefully.
You choose ClassPass spots per class, at the bottom of the class form (Schedule → Add Event → Group Class).
 The spot numbers are specific seats, not a quantity
When you select spots for ClassPass, each number is a specific spot in the class — not a count of how many spots to give ClassPass.
In a 6-person class, selecting spot 5 and spot 6 does not give ClassPass 6 spots, or "up to 6." It allocates exactly 2 spots — seats 5 and 6.
So the number of spots ClassPass gets is how many you tick, not the highest number you tick. To give ClassPass 4 spots, you must select 4 spots.

This design is deliberate and useful for studios with fixed positions — a spin or reformer studio can put specific bikes or reformers on ClassPass (e.g. only the back row), leaving the prime spots for members.
Want to give ClassPass more spots? Check each class individually. Because allocation is per-spot and per-class, a class only offers as many ClassPass spots as you've ticked on that class. If ClassPass availability looks low, it's almost always because not enough spots were selected on the individual classes.
Bulk-enabling existing classes
Already built your schedule and skipped the ClassPass step? Update many classes at once:
- Go to Schedule → Actions → Edit Schedule.

- Filter to the classes you want — you don't need every field; a date range alone is fine.

- Choose ClassPass and select the spots to make available.

- Apply.
Remember the per-spot rule above applies here too: the spots you select are the ones enabled across the matched classes.
A note on SmartSpot
ClassPass offers an optional feature called SmartSpot — an algorithm that automatically determines which spots to put on sale for each class. If you enable SmartSpot, it overrides the spot allocation you configured in Vibefam.
If you want to keep control of exactly which spots ClassPass sells, leave SmartSpot off. Turn it on only if you'd rather let ClassPass's algorithm optimise availability for you.
That's it — you're integrated with ClassPass. Bookings made on ClassPass now reflect in Vibefam automatically.