
What You Can View in Leads Overview
-
All Leads → Total number of leads
-
New Leads → Leads created in the past 7 days
-
Trials → Leads with active trial packages
-
ClassPass Leads → If your studio is integrated with ClassPass

Searching & Filtering Leads
You can filter leads by:

-
Booking number
-
Attendance
-
Last contacted
-
Last created
-
Lead source
-
Lead status (Lead / Cold / Trial)
-
Trial expiry
-
Trial package
Editing Lead Source
You can update the Source column with options such as:

-
Facebook & Instagram Ads
-
Vibefam SmartFill
-
ClassPass
-
Website Form
-
Website Widget
-
etc
Updating Lead Status
-
Click the Actions (pencil icon)
-
Select Lead or Cold from the dropdown

Importing Leads
You can bulk import leads using a CSV file.

Steps to Import Leads:
-
Download the Leads Data Template
-
Copy & paste your leads into the template (do not rename columns)
-
Upload the file via Import Leads

Required CSV Columns:
-
Name (e.g., John Doe)
-
Phone Number (e.g., 65321875)
-
Email Address (e.g., johndoe@gmail.com)
-
Source (must match one of the available lead sources exactly)

Adding Leads Manually
-
Click Add New Leads

-
Enter name, email address, and phone number
-
Select source from dropdown
-
Click Add New Lead

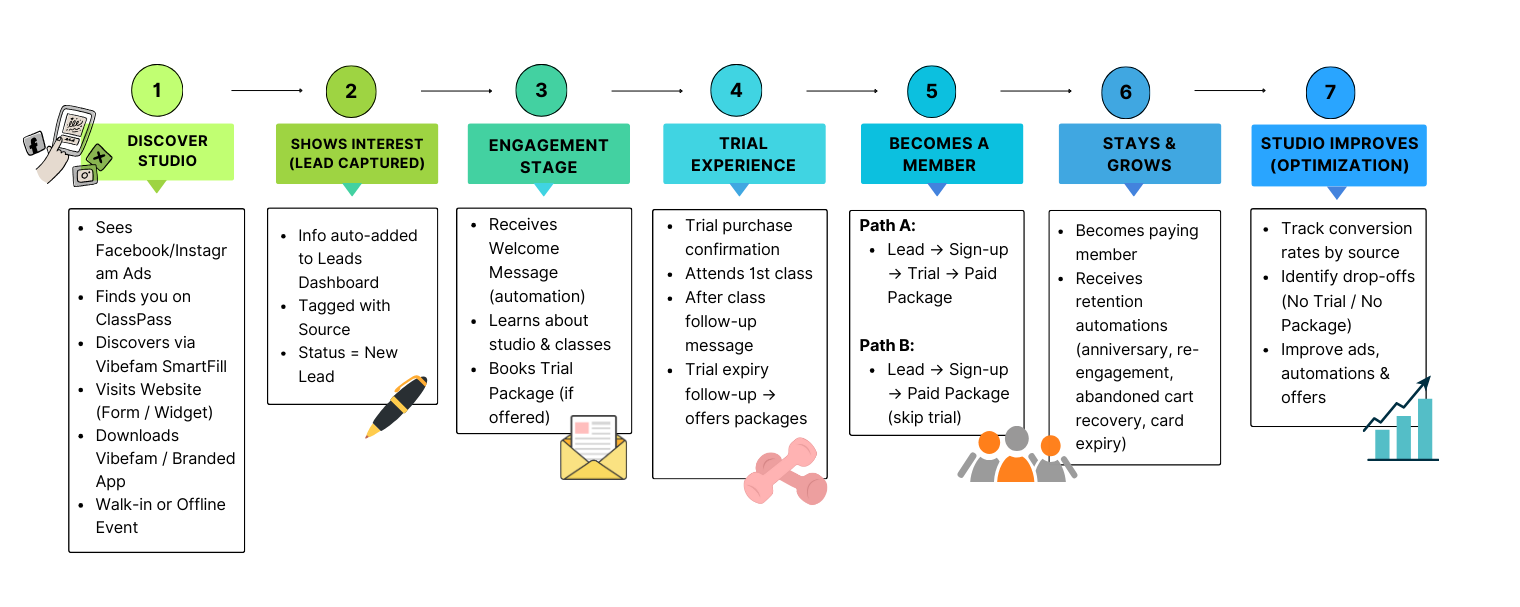
Customer Journey Flow
Integrations

Acquire more leads by integrating Vibefam with popular marketplaces and advertising platforms.
-
Facebook and Instagram Ads
-
When a user submits their information through the ad form, a lead is automatically created in your Leads Dashboard with the source “Facebook and Instagram Ads.”
-
-
Vibefam SmartFill
-
List your classes on Vibefam’s marketplace at a discount to attract new leads.
-
-
ClassPass
-
Connect your Vibefam account with ClassPass to capture leads from the ClassPass marketplace.
-
When a ClassPass user books your class for the first time, they are automatically added to your Leads Dashboard.
-
To set up integration: go to Configure → ClassPass Integration.
-
Website Integrations

Embed forms and widgets on your website to capture leads directly into Vibefam.
-
Website Form
-
When a visitor submits the form, the lead appears automatically on your Leads Dashboard.
-
To install: copy the code snippet provided in your Form Widget field and paste it into your website or website builder (e.g., Wix, WordPress, Shopify).
-
Example code:
<iframe src="https://bookings.vibefam.com/ffwishes/interest#widget" width="100%" frameborder="0" height="380px" scrolling="no"></iframe>
-
-
Website Widget
-
An interactive widget that allows leads to book classes, view schedules, and more.
-
When a visitor interacts with the widget, the lead is automatically created.
-
To set up: go to Configure → Website Widgets, then embed the code into your website.
-
Vibefam Applications

When users sign up through any Vibefam app, they are added as leads automatically.
-
Branded App (if applicable)
-
Your studio’s own mobile app (customized with logo and branding).
-
When someone signs up, the lead is created on the dashboard.
-
-
Vibefam App
-
When a user purchases a trial package from the Vibefam mobile app, the lead is created automatically.
-
-
Booking Website
-
Leads who sign up via your booking website will appear in the dashboard.
-
To set up: go to Configure → Booking Website.
-
Created by You

These are leads you or your team add manually.
-
Imported Lead
-
Import leads from a CSV file into the dashboard. (See Leads Overview -> Import Leads for details).
-
-
Created by Admin (Member)
-
When an admin creates a new member account under the “Members” tab, the lead is created automatically.
-
-
Migrated Member
-
When members are migrated from a CSV file, they appear as leads in the dashboard.
-
To migrate members: go to Configure → Migrate Members.
-
-
Created by Admin (Lead)
-
When an admin adds a lead manually under the Leads Overview page, the lead appears automatically.

-
Custom Lead Sources
You can create your own lead sources for offline or special cases (e.g., walk-ins, event collaborations).

To create a custom lead source:
-
Click Add New Source.
-
Enter the source name (e.g., “Walk-In”).
-
Add notes if needed.
-
Click Add New Source.
Automations
The Automations tab in Lead Management helps you send tailored, automated messages to both leads and members. With flexible on/off toggles, you can ensure the right message reaches the right person at the right time.
The automation pipeline works like a funnel, guiding leads step by step toward conversion and long-term loyalty. It moves through four key stages: Leads and Members, Trials, Class and Bookings, and Retention and Recovery.

Each stage has specific use cases designed to boost engagement, drive growth, and increase revenue.
1. Leads and Members

Helps you capture, nurture, and onboard new leads or members.
-
New Leads
-
Capture and manage potential leads from ads, ClassPass, referrals, or walk-ins.
-
Set up different messaging sequences (Message 1, 2, 3, etc.) at different cadences depending on the audience or lead source.
-
Example: a lead from ads may receive a different nurturing sequence compared to a ClassPass lead.
-
If a lead progresses to sign-up, the new lead automation stops automatically (no double messaging).
-
-
Sign Ups or New Members
-
Welcome and onboard anyone who signs up for an account.
-
Introduce your services, studio culture, and offerings.
-
Messaging can also be tailored by audience. For example, if a ClassPass client signs up, the system transitions them seamlessly from the New Lead automation to the Sign-Up automation, ensuring no overlap in communication.
-
2. Trials

Keeps trial users engaged and nudges them toward membership.
-
Trial Purchase
-
Confirm trial package purchases and provide a clear summary.
-
Share practical information such as directions to your studio, parking, or what to prepare for their first class.
-
Set clear expectations by outlining class guidelines, studio policies, or helpful tips for first-timers.
-
Note: Messages will not be sent if the lead has already converted to a paying customer.
-
-
Follow-Up After Trial Expired
-
Automatically follow up once a trial ends to encourage users to join as paying customers.
-
Suggest next steps or recommend the most suitable packages based on their trial activity.
-
Customize follow-up cadences (e.g., 7 days, 14 days after expiry) with tailored messages at each stage.
-
Run targeted promotions or offer limited-time discounts to less engaged trial users to increase conversion.
-
Reinforce the benefits of becoming a member, such as access to exclusive classes, special pricing, or community perks.
-
Note: Messages will not be sent if the lead has already converted to a paying customer.
-
3. Class and Bookings

-
After First Class Attendance
-
Check in to understand student sentiment: Did they enjoy the class?
-
Recommend suitable packages to encourage them to continue with your studio.
-
-
Class Anniversary
-
Send a warm message to clients who attended their first class exactly one year ago.
-
Celebrate loyalty and invite them to book again.
-
4. Retention and Recovery

Brings back inactive clients and strengthens relationships with existing ones.
-
Reengagement
-
Automatically send emails to clients who haven’t visited for a set number of days.
-
Tailor messages to different customer segments (e.g., high-value members vs. casual drop-ins).
-
Recover lapsed members and encourage them to book again.
-
-
Credit Card Expiring
-
Notify clients on recurring packages that their card is expiring.
-
Trigger reminders ahead of time (e.g., 2 weeks before expiry) to prevent payment disruptions.
-
-
Abandoned Cart
-
Reach out to clients who started but didn’t complete a purchase.
-
Send automated reminders after a customizable delay (e.g., 24h), nudging them to complete checkout.
-
Customizing Your Automations
To tailor your automation messages, go to Settings → Message List tab:
-
Toggle ON the automation.

-
Select and edit the message (e.g., Message 1).
-
Enter a Message Name (for internal use only).
-
Select the Lead Source that will trigger this automation.
-
Set Up Message: Customize the subject and email content.

-
Configure Automation Settings:
-
Send immediately
-
Or set a delay (days/weeks/months/years)
-
-
Click Apply.

Note: Multiple messages (Message 1, 2, 3…) for different lead sources. This allows flexibility and personalization.
Viewing Performance
To track how your automations are performing, go to the Performance tab:
-
Filters: by message name.
-
Overall Performance Metrics:
- All
- Total sent
- Opened
-
Clicked links
-
Failed

-
Performance Table Columns:
-
Created: When the message was created
-
Recipient Name
-
Recipient Email
-
Message Name
-
Lead Source
-
Status (Sent / Opened / Delivered)
-
Action Time

-
Filter the report

-
Last Created Date → Set a date range to see leads created within that period.
-
Lead Source → Includes:

Leads Conversion Summary

This section shows the number of leads that convert at each step:
-
All Leads → Total number of all leads.
-
Sign Ups → Leads who signed up for an account.
-
Sign Ups to Trials → Leads who purchased a trial package.
-
Trials to Customers → Leads who completed their trial and purchased a non-trial package or course.
-
All Customers → Leads who purchased a non-trial package or registered for a course (including those who skipped the trial).
Lost Leads Summary

This section shows the number of leads that dropped off at each step:
-
All Lost Leads → Total number of leads that didn’t convert.
-
No Sign Up → Leads who never signed up for an account.
-
No Trial Purchase → Leads who signed up but didn’t purchase a trial package.
-
No Package or Course → Leads who purchased a trial but didn’t purchase a non-trial package or register for a course.
Leads Funnel
The Leads Funnel gives a visual bar chart of the conversion journey:
Leads → Signups → Trials → Customers
It shows the total number of leads at each step.

Leads Funnel (Skip Trial)
This funnel shows leads who skipped the trial step and directly became paying customers:
Leads → Signups → Customers
It displays the total number at each step.

Customer Journey
This section provides a roadmap breakdown of the customer journey upon account creation.

Lost Leads
Lost leads are new users who created an account but did not purchase a package.
-
You can set up an automation to capture lost leads.
-
You can also re-engage with these lost leads by sending them an email or even downloading the data to engage with leads manually.

Trials Ongoing
This section showcases customers/members who are in the trial period.

Opportunities
New users/members who are on the trial period are best to keep them engaged and retain them.
-
You can send them an email to engage with them to ask for feedback, how to make the class delightful, and how it makes an impact on their lives.
-
You can download these data to keep them engaged manually.
