---
title: Add Studio Staff & Staff Access
description: Walks through adding your coaches and staff to Vibefam — creating their accounts, setting up payroll, and controlling what each person can access.
---
[Skip to content](https://support.vibefam.com/support-knowledge/add-studio-staff#main-content)
English
Show submenu for translations
[Request for Support](https://support.vibefam.com/support-knowledge/kb-tickets/new?hsLang=en)

- Topics
Show submenu for Topics
- [Getting started](https://support.vibefam.com/support-knowledge/getting-started)
- [Classes, Courses & Appointments](https://support.vibefam.com/support-knowledge/classes-courses-appointments)
- [Packages](https://support.vibefam.com/support-knowledge/packages-payments#packages)
- [Payments](https://support.vibefam.com/support-knowledge/packages-payments#payments)
- [Booking & Scheduling](https://support.vibefam.com/support-knowledge/booking-scheduling)
- [Staff & Instructors](https://support.vibefam.com/support-knowledge/staff-instructors)
- [Members & Family Accounts](https://support.vibefam.com/support-knowledge/members-family-accounts)
- [Notifications & Marketing](https://support.vibefam.com/support-knowledge/notifications-marketing)
- [Integrations & Advanced Features](https://support.vibefam.com/support-knowledge/integrations-advanced-features)
- [Reports & Insights](https://support.vibefam.com/support-knowledge/reports-insights)
- [Studio FAQs](https://support.vibefam.com/studio-owners-faq)
- [Instructor](https://support.vibefam.com/instructors-sign-up)
- [Members](https://support.vibefam.com/members-guide)
Open main navigation
Close main navigation
- Topics
Show submenu for Topics
- [Getting started](https://support.vibefam.com/support-knowledge/getting-started)
- [Classes, Courses & Appointments](https://support.vibefam.com/support-knowledge/classes-courses-appointments)
- [Packages](https://support.vibefam.com/support-knowledge/packages-payments#packages)
- [Payments](https://support.vibefam.com/support-knowledge/packages-payments#payments)
- [Booking & Scheduling](https://support.vibefam.com/support-knowledge/booking-scheduling)
- [Staff & Instructors](https://support.vibefam.com/support-knowledge/staff-instructors)
- [Members & Family Accounts](https://support.vibefam.com/support-knowledge/members-family-accounts)
- [Notifications & Marketing](https://support.vibefam.com/support-knowledge/notifications-marketing)
- [Integrations & Advanced Features](https://support.vibefam.com/support-knowledge/integrations-advanced-features)
- [Reports & Insights](https://support.vibefam.com/support-knowledge/reports-insights)
- [Studio FAQs](https://support.vibefam.com/studio-owners-faq)
- [Instructor](https://support.vibefam.com/instructors-sign-up)
- [Members](https://support.vibefam.com/members-guide)
- English
Show submenu for translations
- [Request for Support](https://support.vibefam.com/support-knowledge/kb-tickets/new)
How can we help you?
- There are no suggestions because the search field is empty.
1. [Support Knowledge Centre](https://support.vibefam.com/support-knowledge?hsLang=en)
2. [Staff & Instructors](https://support.vibefam.com/support-knowledge/staff-instructors?hsLang=en)
# Add Studio Staff & Staff Access
## This article walks through adding your coaches and staff to Vibefam — creating their accounts and controlling what each person can access.
- [Create staff accounts](https://support.vibefam.com/support-knowledge/add-studio-staff#create_staff_accounts)
- [Set up staff roles and access rights](https://support.vibefam.com/support-knowledge/add-studio-staff#set_up_staff_roles_access_rights)
Navigate to **Staff** in the main menu.
---
### **Create staff accounts**
**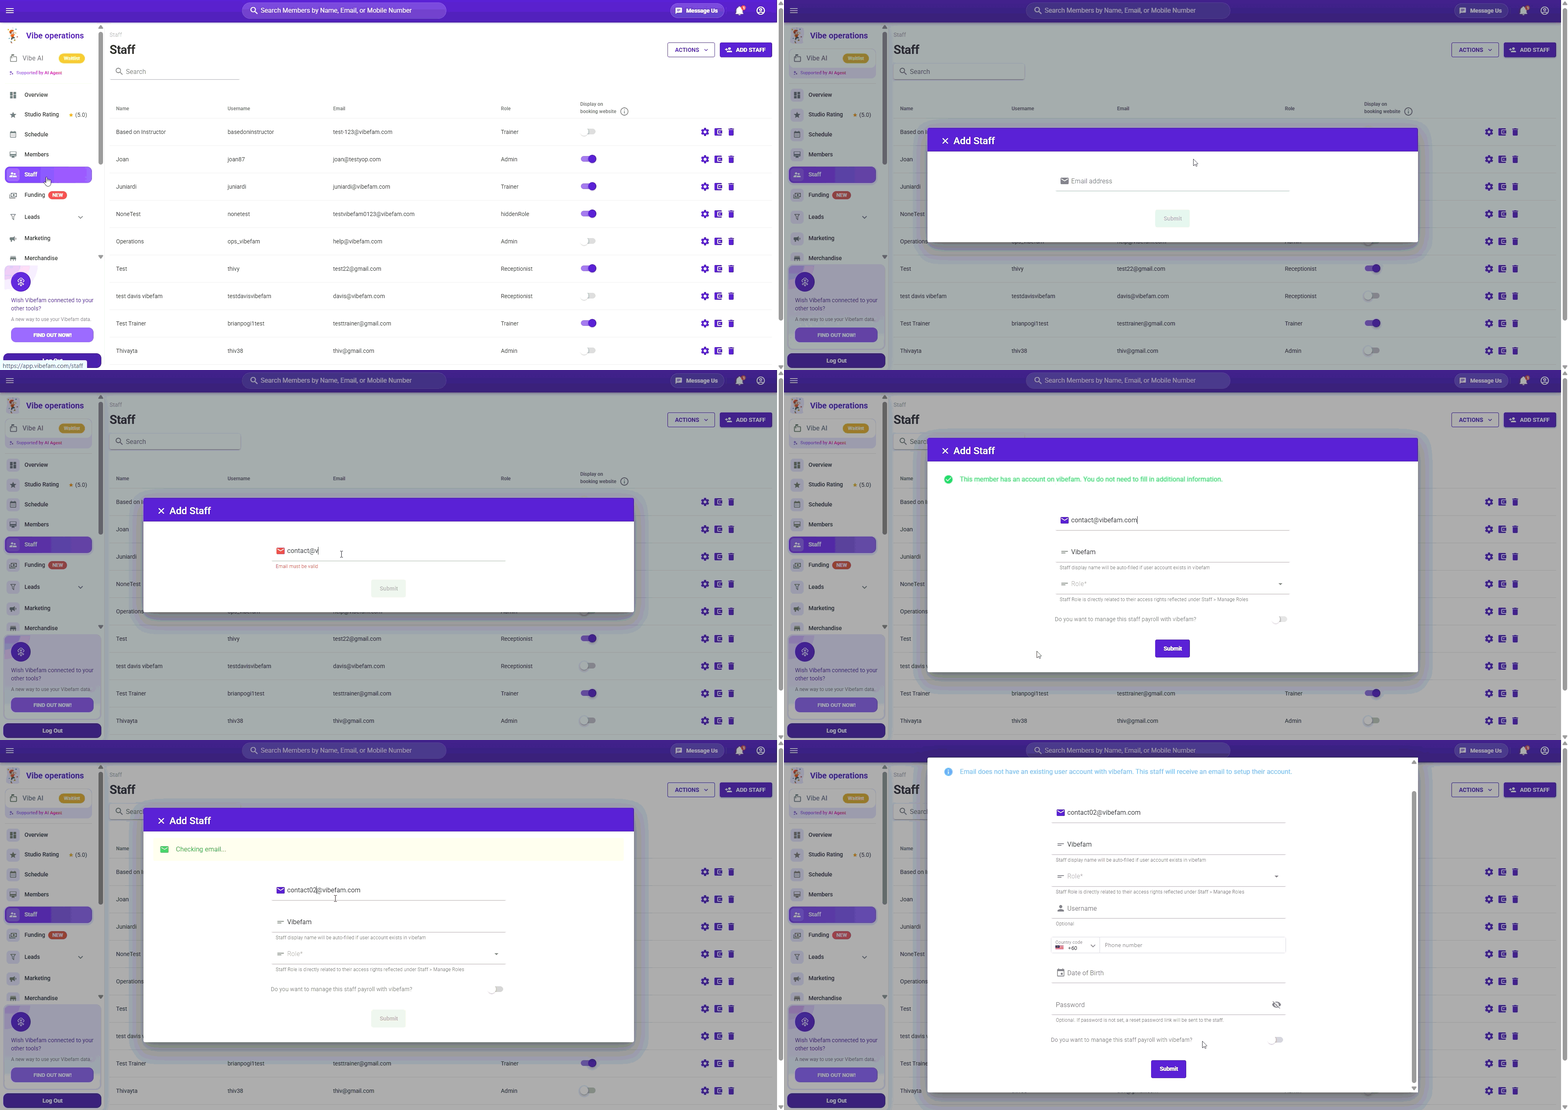**
1. Click **Add Staff**.
2. Enter your staff member's **email**. Vibefam automatically checks whether they already have an account — for example, if they instruct at another Vibefam studio.
- **New to Vibefam** — fill in the details and click **Submit**. They'll receive an email to set their password and log in.
- **Already on Vibefam** — the process is shorter, since their account already exists.
3. Only **Staff Display Name** and **Role** are required. Everything else can be added later.
4. Click **Submit** to save.
If you don't set a password, the staff member is sent a reset-password link to set their own. **Staff roles and payroll can both be configured later** — you don't need everything ready to create the account.
#### **Display on booking website**
**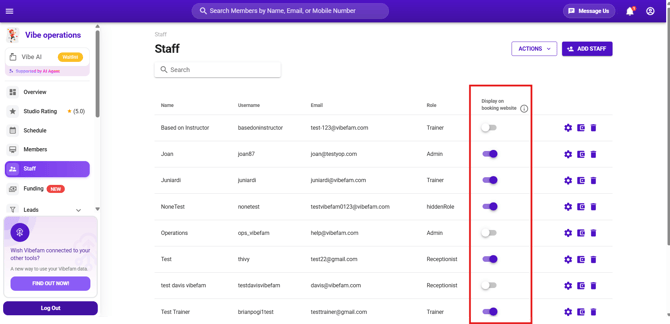**
Each staff member has a **Display on booking website** toggle in the staff list. Turn it **on** for instructors you want members to see when booking, and leave it **off** for back-office staff like admin or reception who don't teach. This controls visibility only — it doesn't affect what the staff member can access.
---
### **Set up staff roles and access rights**
Roles control what each staff member can see and do in the system — so your reception team isn't editing payroll, and your trainers aren't seeing studio revenue.
#### **How many roles you get**
The number of custom roles depends on your plan:
| Plan | Custom roles |
| --- | --- |
| **Great Value** and **Most Popular** | Up to **3 roles** |
| **Professional** | Up to **5 roles** |
If you need more roles than your plan allows, [contact our support team](https://support.vibefam.com/?hsLang=en) to talk through your options.
#### **Creating and editing roles**
1. Click **Actions → Manage Roles**.
2. You'll see your existing roles — for example *Admin*, *Receptionist*, *Trainer*. Open one to edit it, or create a new one.
3. Give the role a **unique name** (up to 50 characters).
4. For each area of the system, set **View** and **Edit** independently:
- **View on, Edit off** — the staff member can see the page but not change anything
- **View on, Edit on** — they can both see and make changes
- **Both off** — the area is hidden from them entirely
5. Hover over the **ⓘ** icon next to any permission to see exactly what it controls.
6. Click **Save**.
Setting View and Edit separately is what lets you build a role like reception — able to see the schedule and check members in, but not touch payroll, pricing, or integrations.
#### **Applying changes to existing staff**
**Important:** When you update a role, tick the option to update existing staff permissions. Otherwise your changes apply only to staff created from that point on, and everyone already on that role keeps their old permissions.
Remember to click **Submit** to save any changes.
- [Getting started](https://support.vibefam.com/support-knowledge/getting-started?hsLang=en)
- [Classes, Courses & Appointments](https://support.vibefam.com/support-knowledge/classes-courses-appointments?hsLang=en)
- [Packages & Payments](https://support.vibefam.com/support-knowledge/packages-payments?hsLang=en#main-content)
- [Packages](https://support.vibefam.com/support-knowledge/packages-payments?hsLang=en#packages)
- [Payments](https://support.vibefam.com/support-knowledge/packages-payments?hsLang=en#payments)
- [Booking & Scheduling](https://support.vibefam.com/support-knowledge/booking-scheduling?hsLang=en)
- [Staff & Instructors](https://support.vibefam.com/support-knowledge/staff-instructors?hsLang=en)
- [Members & Family Accounts](https://support.vibefam.com/support-knowledge/members-family-accounts?hsLang=en)
- [Notifications & Marketing](https://support.vibefam.com/support-knowledge/notifications-marketing?hsLang=en)
- [Integrations & Advanced Features](https://support.vibefam.com/support-knowledge/integrations-advanced-features?hsLang=en)
- [Reports & Insights](https://support.vibefam.com/support-knowledge/reports-insights?hsLang=en)
[](https://vibefam.com/)
Fitness management system for top fitness businesses
[mailto:help@vibefam.com](mailto:help@vibefam.com)
Copyright © 2026, Vibefam