---
title: Lead Management
description: Vibefam’s Leads Management feature helps you track, capture, and convert potential customers into paying members. This includes:
---
[Skip to content](https://support.vibefam.com/support-knowledge/lead-management#main-content)
English
Show submenu for translations
[Request for Support](https://support.vibefam.com/support-knowledge/kb-tickets/new?hsLang=en)

- Topics
Show submenu for Topics
- [Getting started](https://support.vibefam.com/support-knowledge/getting-started)
- [Classes, Courses & Appointments](https://support.vibefam.com/support-knowledge/classes-courses-appointments)
- [Packages](https://support.vibefam.com/support-knowledge/packages-payments#packages)
- [Payments](https://support.vibefam.com/support-knowledge/packages-payments#payments)
- [Booking & Scheduling](https://support.vibefam.com/support-knowledge/booking-scheduling)
- [Staff & Instructors](https://support.vibefam.com/support-knowledge/staff-instructors)
- [Members & Family Accounts](https://support.vibefam.com/support-knowledge/members-family-accounts)
- [Notifications & Marketing](https://support.vibefam.com/support-knowledge/notifications-marketing)
- [Integrations & Advanced Features](https://support.vibefam.com/support-knowledge/integrations-advanced-features)
- [Reports & Insights](https://support.vibefam.com/support-knowledge/reports-insights)
- [Studio FAQs](https://support.vibefam.com/studio-owners-faq)
- [Instructor](https://support.vibefam.com/instructors-sign-up)
- [Members](https://support.vibefam.com/members-guide)
Open main navigation
Close main navigation
- Topics
Show submenu for Topics
- [Getting started](https://support.vibefam.com/support-knowledge/getting-started)
- [Classes, Courses & Appointments](https://support.vibefam.com/support-knowledge/classes-courses-appointments)
- [Packages](https://support.vibefam.com/support-knowledge/packages-payments#packages)
- [Payments](https://support.vibefam.com/support-knowledge/packages-payments#payments)
- [Booking & Scheduling](https://support.vibefam.com/support-knowledge/booking-scheduling)
- [Staff & Instructors](https://support.vibefam.com/support-knowledge/staff-instructors)
- [Members & Family Accounts](https://support.vibefam.com/support-knowledge/members-family-accounts)
- [Notifications & Marketing](https://support.vibefam.com/support-knowledge/notifications-marketing)
- [Integrations & Advanced Features](https://support.vibefam.com/support-knowledge/integrations-advanced-features)
- [Reports & Insights](https://support.vibefam.com/support-knowledge/reports-insights)
- [Studio FAQs](https://support.vibefam.com/studio-owners-faq)
- [Instructor](https://support.vibefam.com/instructors-sign-up)
- [Members](https://support.vibefam.com/members-guide)
- English
Show submenu for translations
- [Request for Support](https://support.vibefam.com/support-knowledge/kb-tickets/new)
How can we help you?
- There are no suggestions because the search field is empty.
1. [Support Knowledge Centre](https://support.vibefam.com/support-knowledge?hsLang=en)
2. [Integrations & Advanced Features](https://support.vibefam.com/support-knowledge/integrations-advanced-features?hsLang=en)
# Lead Management
Vibefam's Lead Management helps you capture, track, and convert potential customers into paying members — from the first time someone shows interest through to their first purchase and beyond. It brings every lead source, nurture message, and conversion metric into one place.
- [Leads Overview](https://support.vibefam.com/support-knowledge/lead-management#leads_overview)
- [Lead Capture & Sources](https://support.vibefam.com/support-knowledge/lead-management#lead_capture_sources)
- [Automations](https://support.vibefam.com/support-knowledge/lead-management#automations)
- [Lead Conversion Report](https://support.vibefam.com/support-knowledge/lead-management#lead_conversion_report)
- [Sales](https://support.vibefam.com/support-knowledge/lead-management#sales)
Navigate to **Leads**.
---
### **Leads Overview**
The **Leads Overview** tracks potential customers who've shown interest but haven't yet purchased a package or registered for a course.
#### **What is a lead?**
A lead is a "warm contact" — someone who's shown some level of interest but hasn't committed. Leads come from account sign-ups without a purchase, trial registrations, and contacts from your website, booking site, branded app, the Vibefam app, or social media ads.
#### **Lead status types**
- **Lead** — interested but hasn't purchased yet (e.g. account created, trial signed up, form filled from a social ad).
- **Cold** — very low or no engagement (e.g. from a purchased list, referral, or event, but never interacted).
#### **What you can view**
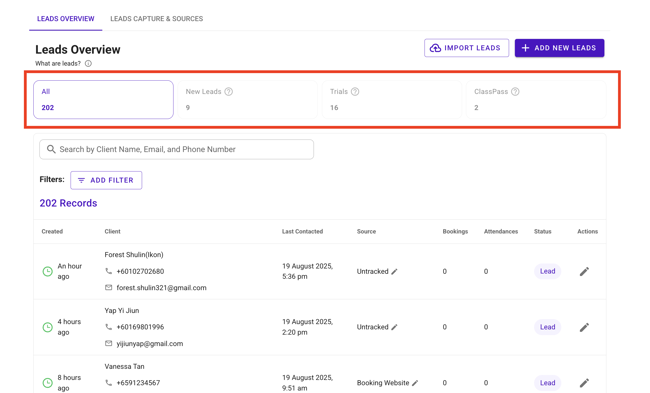
The overview breaks your leads into quick views:
- **All Leads** — your total
- **New Leads** — created in the past 7 days
- **Trials** — leads with an active trial package
- **ClassPass Leads** — if your studio is integrated with ClassPass
#### **Searching & filtering**
Filter your leads by booking number, attendance, last contacted, last created, lead source, lead status (Lead / Cold / Trial), trial expiry, and trial package.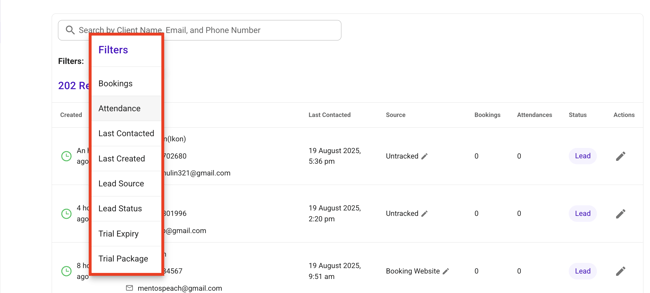
#### **Editing a lead's source**
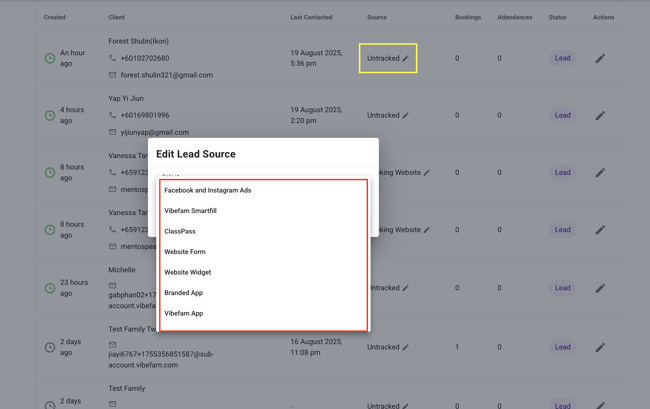
Update the **Source** column to reflect where a lead came from — Facebook & Instagram Ads, Vibefam SmartFill, ClassPass, Website Form, Website Widget, and more.
#### **Updating a lead's status**
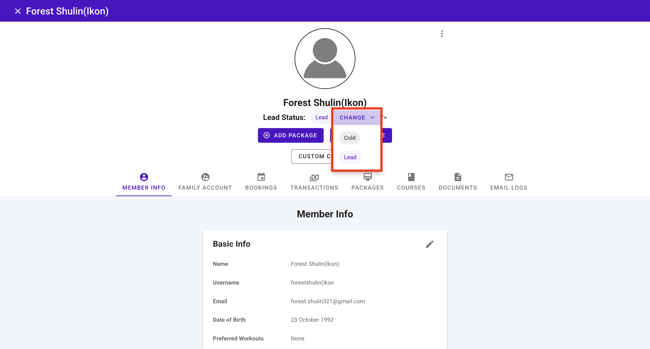
1. Click the **Actions (pencil)** icon.
2. Select **Lead** or **Cold** from the dropdown.
#### **Importing leads in bulk**
You can import leads from a CSV file.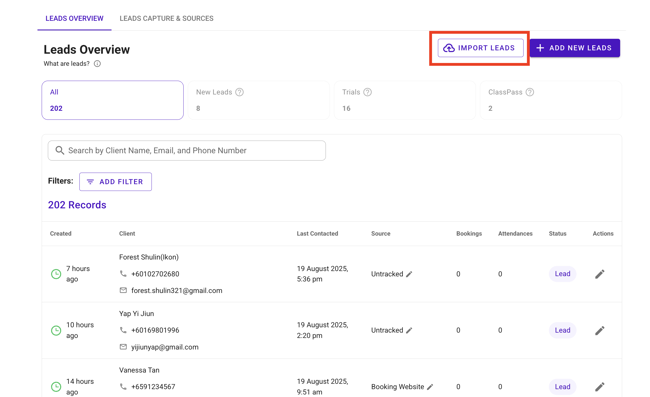
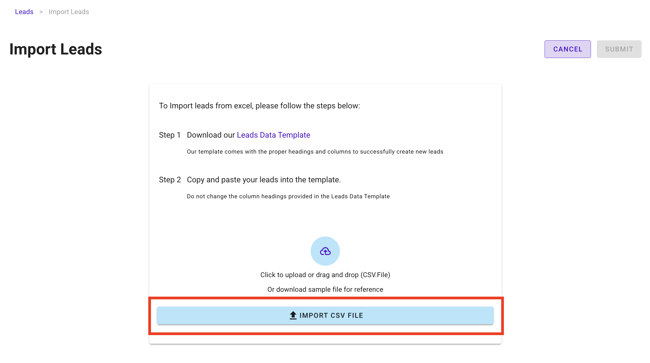
1. Download the **Leads Data Template**.
2. Copy your leads into the template — **don't rename the columns**.
3. Upload it via **Import Leads**.
 **Required columns:** Name, Phone Number, Email Address, and Source (which **must exactly match** one of your available lead sources — a mismatch is the most common cause of a failed import).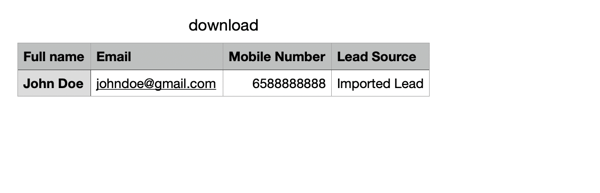
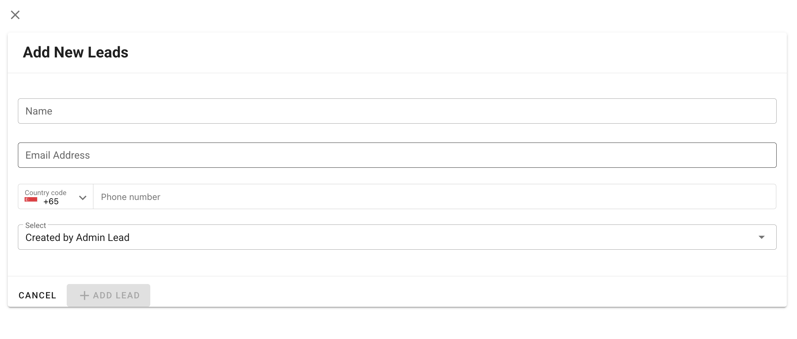
#### **Adding a lead manually**
1. Click **Add New Lead**.
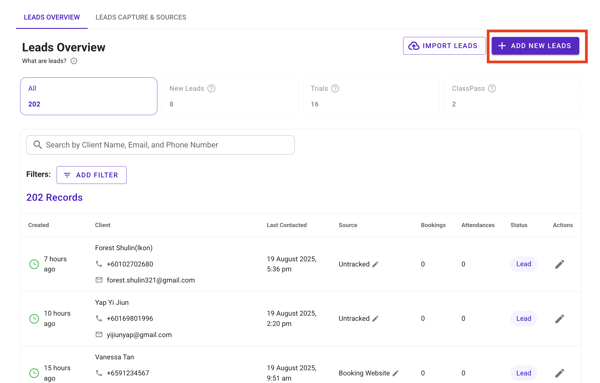
2. Enter the name, email, and phone number.
3. Select a source from the dropdown.
4. Click **Add New Lead**.
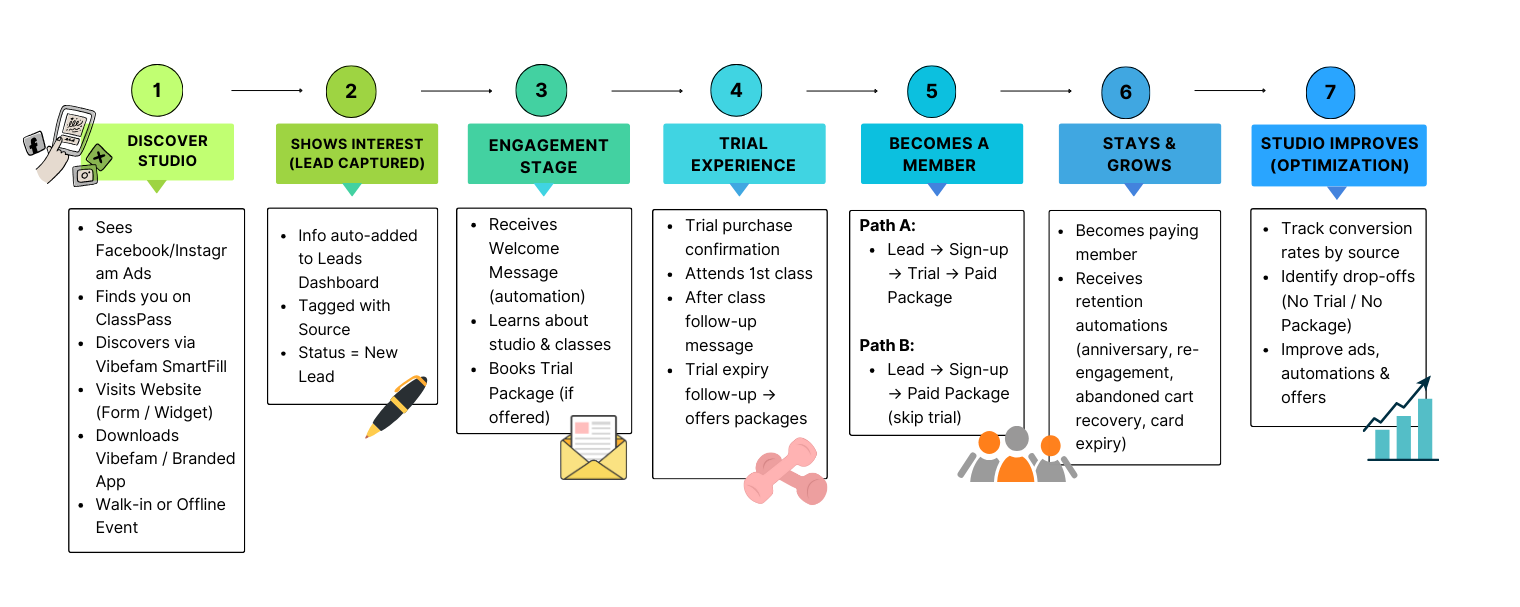
#### **The customer journey**
---
### **Lead Capture & Sources**
The **Lead Capture & Sources** section shows where your leads come from. Sources fall into five categories.
#### **Integrations**
Capture leads from marketplaces and ad platforms.

- **Facebook & Instagram Ads** — when someone submits an ad lead form, a lead is created automatically with this source.
- **Vibefam SmartFill** — list your classes on Vibefam's marketplace at a discount to attract new leads.
- **ClassPass** — when a ClassPass user books your class for the first time, they're added to your leads automatically. Set up under **Configure → ClassPass Integration**.
#### **Website integrations**
Embed forms and widgets to capture leads directly from your site.

- **Website Form** — a visitor submits the form, and the lead appears automatically. Copy the code from your **Form Widget** field and paste it into your site (Wix, WordPress, Shopify, etc.). Example: ``
- **Website Widget** — an interactive widget for booking classes and viewing schedules; interacting with it creates a lead. Set up under **Configure → Website Widgets** (see [Embed Website Widgets](https://support.vibefam.com/studio-owners-website-widgets?hsLang=en)).
#### **Vibefam applications**
Users who sign up through any Vibefam app become leads automatically.

- **Branded App** — your studio's own app; a sign-up creates a lead.
- **Vibefam App** — buying a trial package in the Vibefam app creates a lead.
- **Booking Website** — sign-ups via your booking site appear as leads. Set up under **Configure → Booking Website**.
#### **Created by you**
Leads you or your team add.
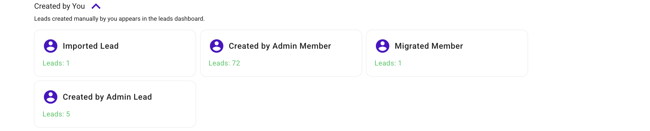
- **Imported Lead** — from a CSV (see Importing leads above).
- **Created by Admin (Member)** — creating a new member under the Members tab creates a lead automatically.
- **Migrated Member** — members migrated from CSV appear as leads. Migrate under **Configure → Migrate Members** (see [Member Migration](https://support.vibefam.com/studio-owners-add-members-and-migration?hsLang=en)).
- **Created by Admin (Lead)** — a lead you add manually in Leads Overview.

#### **Custom lead sources**
Create your own sources for offline or special cases (walk-ins, event collaborations, etc.).
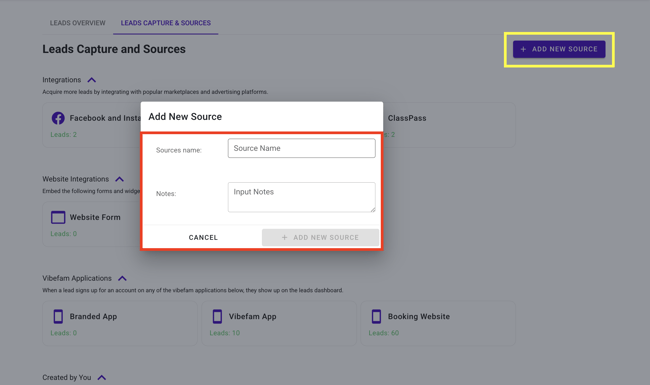
1. Click **Add New Source**.
2. Enter the **source name** (e.g. "Walk-In").
3. Add notes if needed.
4. Click **Add New Source**.
---
### **Automations**
The **Automations** tab sends tailored, automated messages to leads and members, with on/off toggles so the right message reaches the right person at the right time.
The pipeline works like a funnel, guiding leads toward conversion and long-term loyalty through four stages: **Leads and Members → Trials → Class and Bookings → Retention and Recovery.**
#### **1. Leads and Members**
Capture, nurture, and onboard new leads and members.
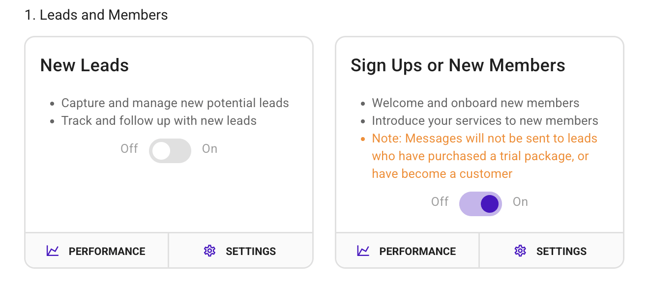
- **New Leads** — nurture leads from ads, ClassPass, referrals, or walk-ins with different message sequences (Message 1, 2, 3…) at different cadences by source. If a lead signs up, the new-lead sequence stops automatically, so there's no double-messaging.
- **Sign Ups / New Members** — welcome and onboard anyone who creates an account, and introduce your studio. A lead who converts transitions cleanly from the New Lead sequence to the Sign-Up sequence, with no overlap.
#### **2. Trials**
Keep trial users engaged and nudge them toward membership.
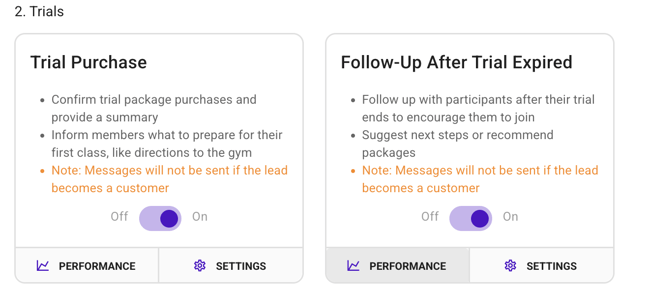
- **Trial Purchase** — confirm the trial, share practical info (directions, parking, what to prepare), and set expectations.
- **Follow-Up After Trial Expired** — follow up automatically once a trial ends, with tailored cadences (e.g. 7 and 14 days after expiry), targeted promos, and reminders of member benefits.
> Both trial automations stop automatically once a lead becomes a paying customer, so nobody gets a "come back" message after they've already joined.
#### **3. Class and Bookings**
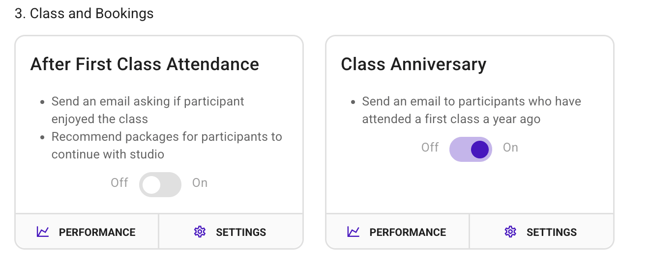
- **After First Class Attendance** — check in on how they found the class, and recommend a suitable package.
- **Class Anniversary** — send a warm message to clients on the one-year anniversary of their first class, and invite them to book again.
#### **4. Retention and Recovery**
Bring back inactive clients and strengthen existing relationships.
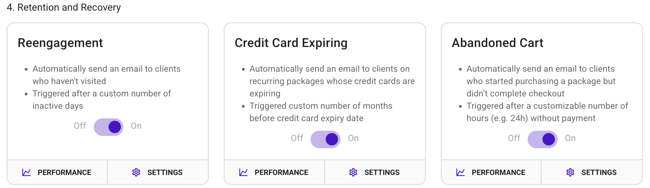
- **Reengagement** — email clients who haven't visited in a set number of days, tailored by segment (e.g. high-value members vs. casual drop-ins).
- **Credit Card Expiring** — remind recurring-package clients ahead of time (e.g. 2 weeks before) so renewals don't fail.
- **Abandoned Cart** — reach out to clients who started but didn't finish a purchase, after a delay you set (e.g. 24 hours).
#### **Customising your automations**
Go to **Settings → Message List** tab.
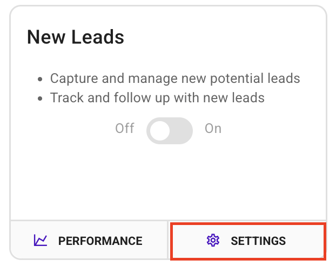
1. Toggle the automation **on**.

2. Select and edit the message (e.g. Message 1).
3. Enter a **Message Name** (internal use only).
4. Select the **Lead Source** that triggers this automation.
5. **Set up the message** — customise the subject and email content.
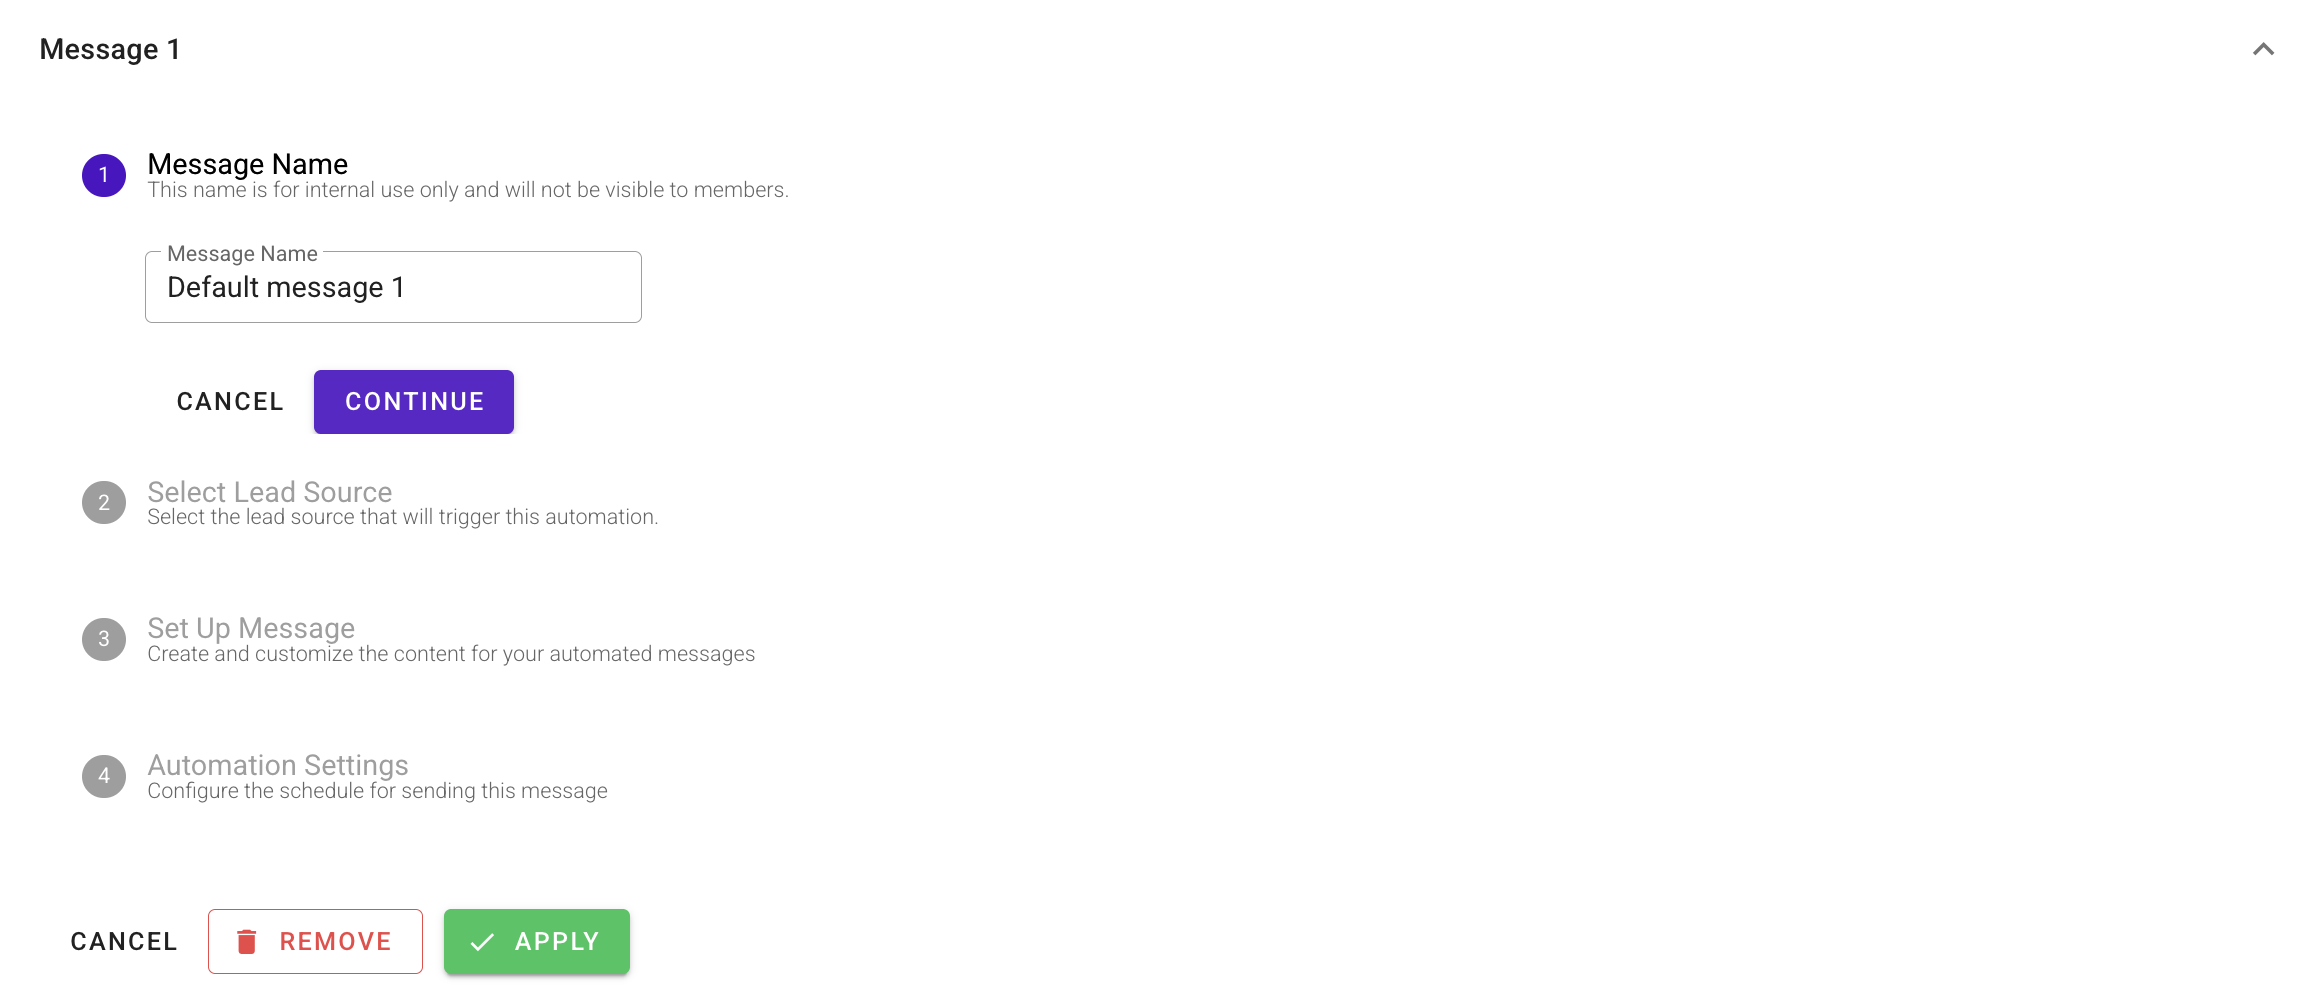
6. Configure **Automation Settings** — send **immediately**, or after a **delay** (days/weeks/months).
7. Click **Apply**.
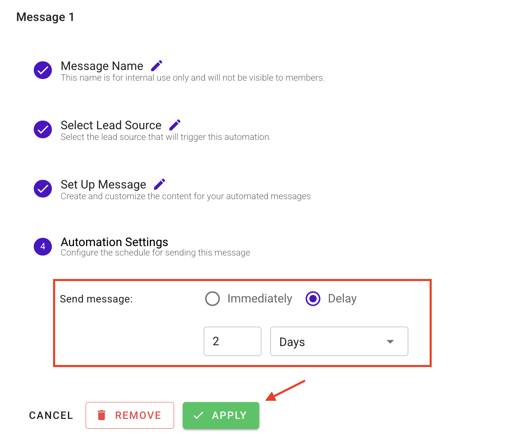
You can set multiple messages (Message 1, 2, 3…) for different lead sources — so an ads lead and a ClassPass lead each get their own sequence.
#### **Viewing performance**
Go to the **Performance** tab.
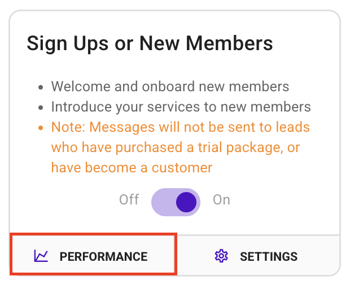
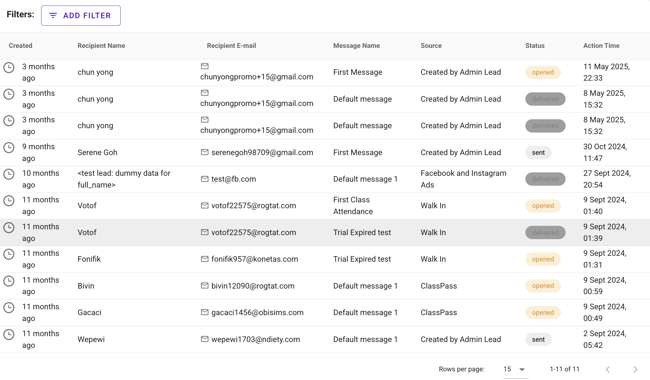
Filter by message name, and track: **Total sent, Opened, Clicked links,** and **Failed.**

The performance table shows Created date, Recipient Name, Recipient Email, Message Name, Lead Source, Status (Sent / Opened / Delivered), and Action Time.
---
### **Lead Conversion Report**
The **Lead Conversion Report** shows how your leads convert into paying customers — where they convert, where they drop off, and how each source performs.
### Filter the report
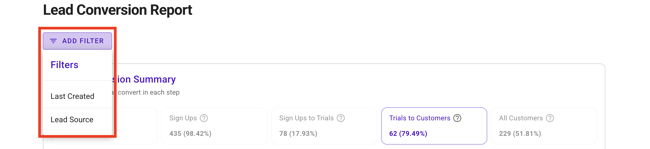
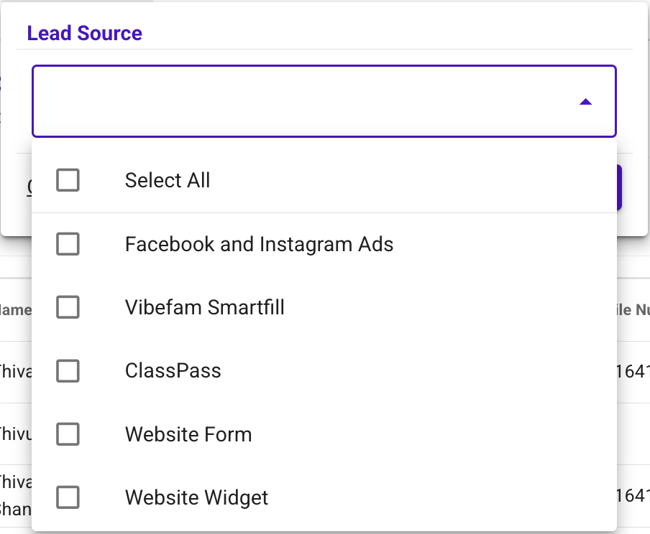
Filter by **Last Created Date** (a date range) and **Lead Source**.
#### **Conversion summary** 
Shows how many leads convert at each step:
- **All Leads** — your total
- **Sign Ups** — leads who created an account
- **Sign Ups to Trials** — leads who bought a trial
- **Trials to Customers** — leads who finished a trial and bought a non-trial package or course
- **All Customers** — everyone who bought a non-trial package or registered for a course (including trial-skippers)
#### **Lost leads summary**

Shows where leads drop off:
- **All Lost Leads** — total who didn't convert
- **No Sign Up** — never created an account
- **No Trial Purchase** — signed up but didn't buy a trial
- **No Package or Course** — bought a trial but never a full package or course
#### **Leads funnel**
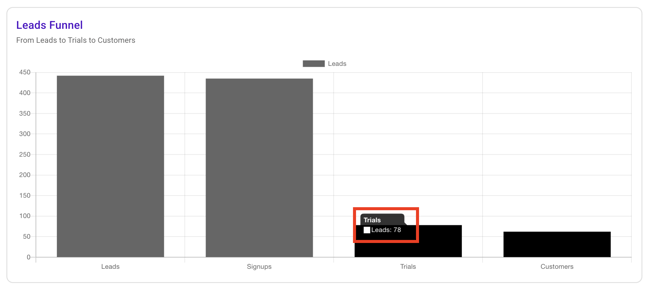
A visual bar chart of the journey: **Leads → Signups → Trials → Customers.**
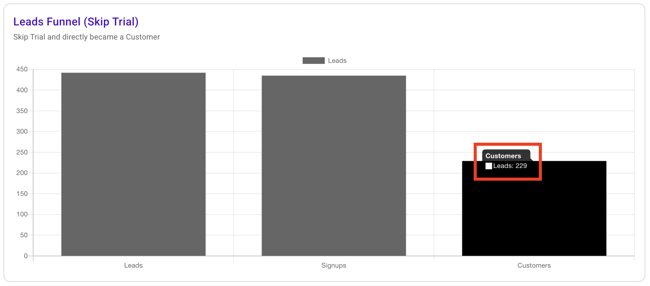
#### **Leads funnel (skip trial)**
The same journey for leads who skipped the trial and became customers directly: **Leads → Signups → Customers.**
---
### **Sales**
The **Sales** section under Leads maps the customer journey and surfaces opportunities to convert leads into members.
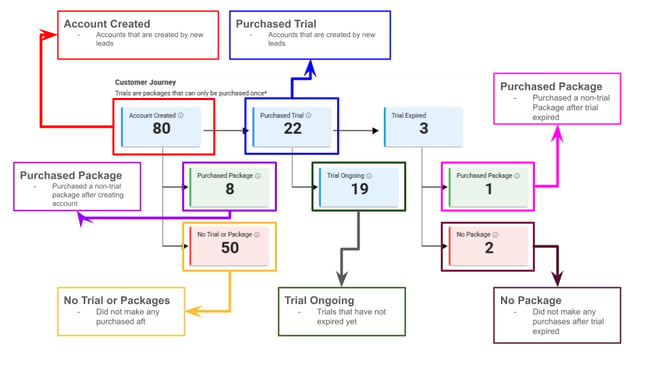
#### **Customer journey**
A roadmap breakdown of the customer journey from account creation.
#### **Lost leads**
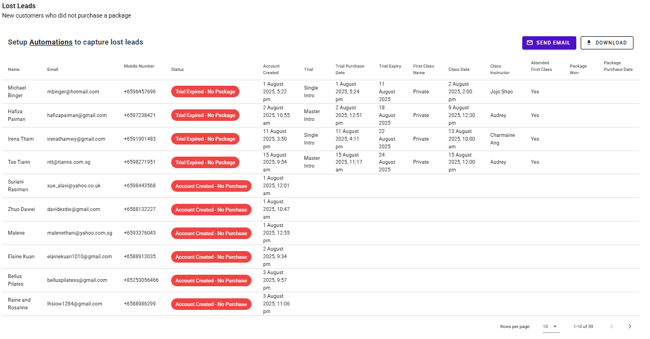
New users who created an account but didn't purchase.
- Set up an automation to capture lost leads.
- Re-engage them by email, or download the data to reach out manually.
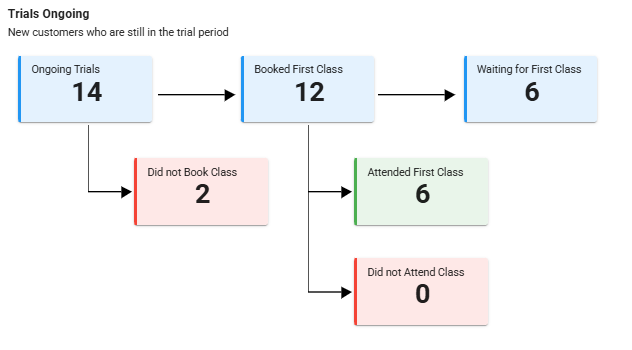
#### **Trials ongoing**
Customers currently in a trial period.
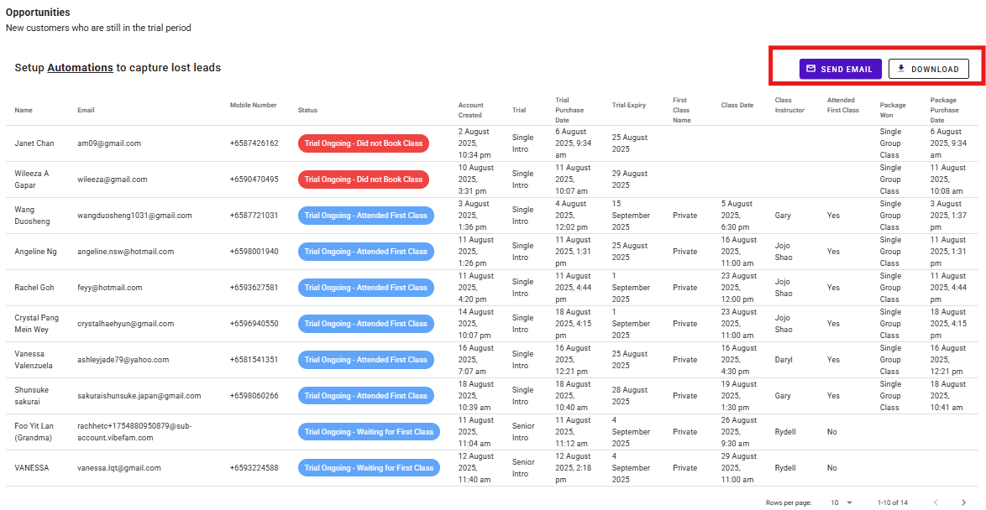
#### **Opportunities**
Trial users worth keeping engaged and retaining.
- Email them for feedback, or to help make their classes more rewarding.
- Download the data to follow up manually.
---
### **Getting the most from it**
- **Match your automation to the source.** A cold ads lead and a warm ClassPass lead need different messages — the per-source sequences exist for exactly this.
- **Watch the funnel for your biggest drop-off**, then aim an automation at that step. If most leads sign up but never buy a trial, that's where a nudge pays off.
- **Check automation performance** so you're improving the messages that get opened and clicked, not just sending more.
- [Getting started](https://support.vibefam.com/support-knowledge/getting-started?hsLang=en)
- [Classes, Courses & Appointments](https://support.vibefam.com/support-knowledge/classes-courses-appointments?hsLang=en)
- [Packages & Payments](https://support.vibefam.com/support-knowledge/packages-payments?hsLang=en#main-content)
- [Packages](https://support.vibefam.com/support-knowledge/packages-payments?hsLang=en#packages)
- [Payments](https://support.vibefam.com/support-knowledge/packages-payments?hsLang=en#payments)
- [Booking & Scheduling](https://support.vibefam.com/support-knowledge/booking-scheduling?hsLang=en)
- [Staff & Instructors](https://support.vibefam.com/support-knowledge/staff-instructors?hsLang=en)
- [Members & Family Accounts](https://support.vibefam.com/support-knowledge/members-family-accounts?hsLang=en)
- [Notifications & Marketing](https://support.vibefam.com/support-knowledge/notifications-marketing?hsLang=en)
- [Integrations & Advanced Features](https://support.vibefam.com/support-knowledge/integrations-advanced-features?hsLang=en)
- [Reports & Insights](https://support.vibefam.com/support-knowledge/reports-insights?hsLang=en)
[](https://vibefam.com/)
Fitness management system for top fitness businesses
[mailto:help@vibefam.com](mailto:help@vibefam.com)
Copyright © 2026, Vibefam