
Plan availability: Merchandise is available on the Professional plan and above.
The Merchandise module lets you keep a catalogue of physical products (apparel, equipment, retail items), track stock levels, record sales against a member's account, and review sales and inventory movement over a date range.
Where to find it: In the left-hand sidebar, click Merchandise (app.vibefam.com/merchandise).
The page has three tabs:
| Tab | What it's for |
|---|---|
| Products | Your product catalogue — add products, manage categories, adjust stock, control visibility |
| Orders | Every merchandise order — create manual orders, update order status, download receipts |
| Reports | Sales and inventory movement over a date range |
Part 1 — Products
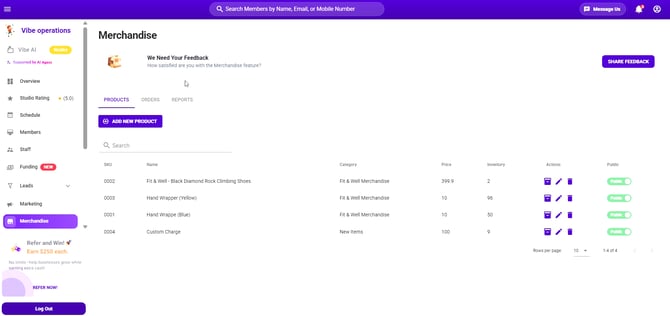
The Products tab lists your catalogue with the following columns:
- SKU — your unique product code
- Name
- Category
- Price
- Inventory — current stock on hand
- Actions — Inventory, Edit, Delete
- Public — visibility toggle
Use the Search field above the table to find a product, and Rows per page at the bottom to page through a longer catalogue.
Add a new product
- Go to Merchandise → Products.
- Click ADD NEW PRODUCT.
- Fill in the form:
| Field | Helper text in the form | Notes |
|---|---|---|
| SKU | Unique code to identify your products | Your own product code, e.g. 0012 |
| Product Name | Enter Product name | The name members and staff will see |
| Images | Add at least 1 image here | Click the field to open your file browser and select an image |
| Description | Please add the description of product here | Free text |
| Category | Select the category for this product | Choose an existing category, or click + to create a new one |
| Price | Price | Numeric value in your studio's currency |
| Inventory quantity | Enter the inventory quantity | Starting stock level |
Click SUBMIT.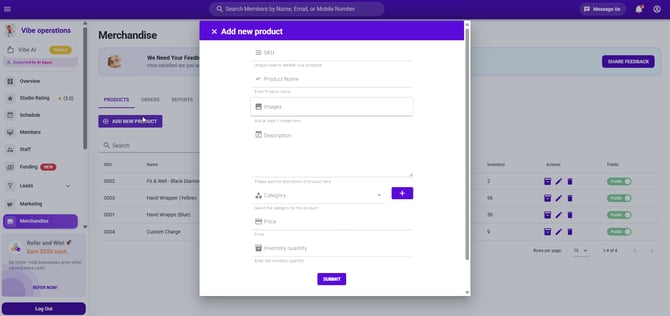
Create a product category
Categories group products together and are used in reporting.
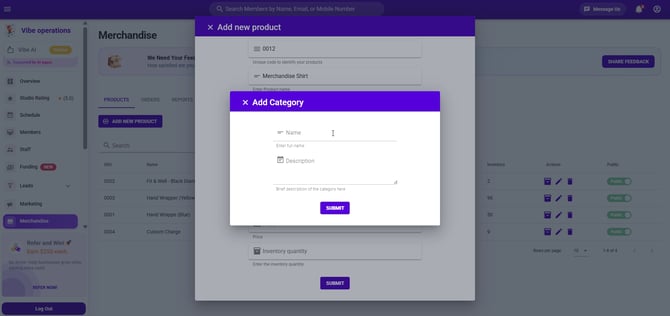
- In the Add new product (or Edit product) form, click the + button beside the Category dropdown.
- In the Add Category window, enter:
- Name — Enter full name
- Description — Brief description of the category here
- Click SUBMIT.
The new category becomes selectable in the Category dropdown straight away.
Edit a product
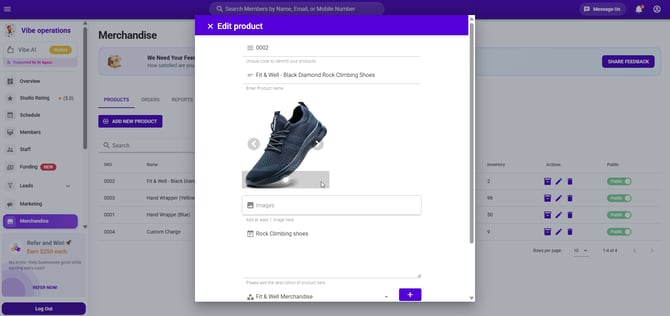
- On the product row, click the pencil icon under Actions.
- The Edit product window opens with the same fields as the add form, plus a preview carousel of the product's existing images — use the ‹ and › arrows to move between them.
- Make your changes and submit.
Adjust inventory
Inventory is adjusted by change amount, not by typing a new total.
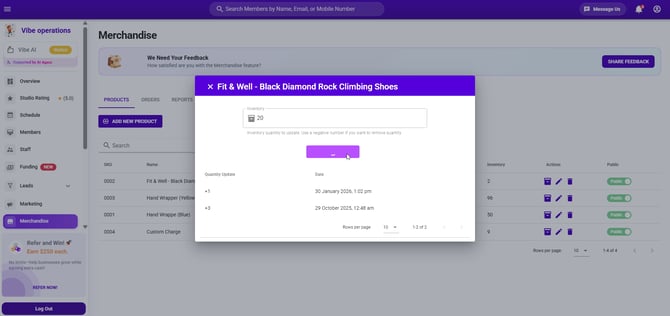
- On the product row, click the first Actions icon (tooltip: Inventory).
- A window opens titled with the product name and an Inventory field. The helper text reads: Inventory quantity to update. Use a negative number if you want to remove quantity.
- Enter the amount to add — or a negative number to remove stock.
- Click the button below the field. Its label reflects what you typed, e.g. ADD 1 QUANTITY.
- A green Success! message confirms the change and the Inventory column updates.
The same window shows a running history of adjustments in a Quantity Update / Date table (e.g. +1 — 30 January 2026, 1:02 pm), so you can see when stock was added or removed.
Make a product public
Each product row has a toggle in the Public column. Use it to control whether the product is visible to members.
Delete a product
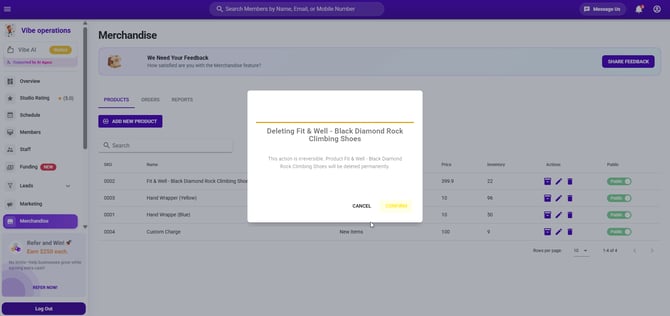
- Click the trash icon under Actions.
- A confirmation window appears: "This action is irreversible. Product [name] will be deleted permanently."
- Click CONFIRM to delete, or CANCEL to keep the product.
Part 2 — Orders
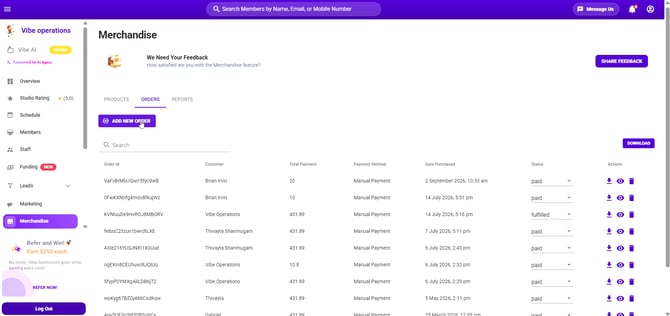
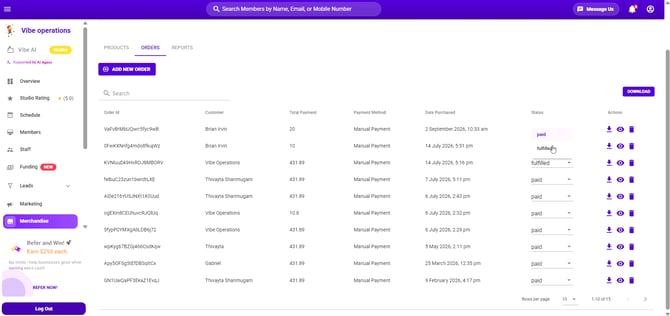
The Orders tab lists every merchandise order with these columns:
- Order Id
- Customer
- Total Payment
- Payment Method
- Date Purchased
- Status — an editable dropdown (values seen:
paid,fulfilled) - Actions — Download Receipt, View, Delete
Use Search to find an order, and the DOWNLOAD button on the right to export the order list.
Create an order manually
Use this when a member buys something in person at the front desk.
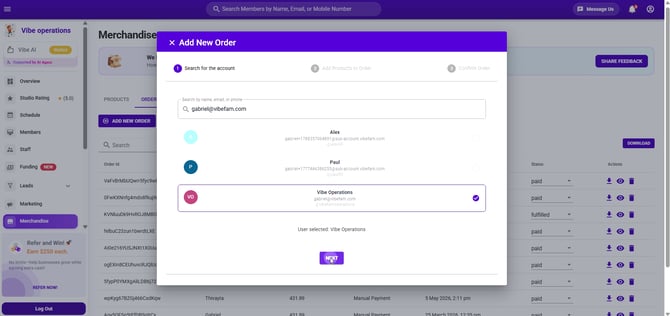
Step 1 — Search for the account
- Click ADD NEW ORDER.
- In Search by name, email, or phone, type the member's details.
- Select the correct account from the results — the selection is confirmed below the list ("User selected: [name]").
- Click NEXT.
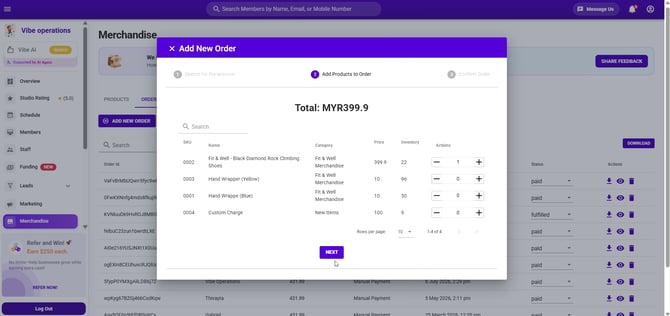
Step 2 — Add products to order
- Find the product in the list (there's a Search field above the table).
- Use − and + in the Actions column to set the quantity.
- The running Total is shown at the top of the window.
- Click NEXT.
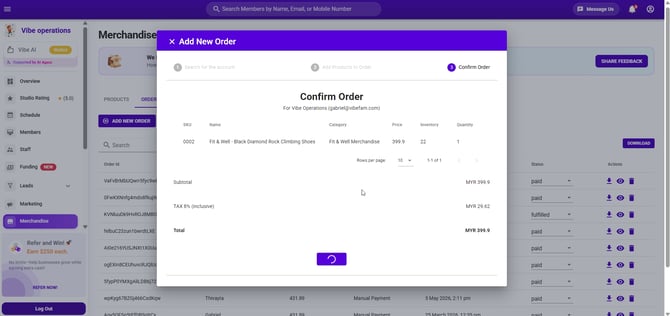
Step 3 — Confirm order
- Review the summary: the account the order is for, the line items, Subtotal, TAX, and Total.
- Click the submit button to complete the order.
A green Success! message appears and the new order is added to the top of the Orders list. Stock is deducted from the product's inventory.
Update an order's status
In the Status column, click the dropdown on the order row and choose the new status (e.g. change paid to fulfilled once the member has collected the item).
Order row actions
| Icon | Tooltip | What it does |
|---|---|---|
| Download arrow | Download Receipt | Downloads the receipt for that order |
| Eye | Order infomation | To view the order details |
| Trash | Delete | Deletes the order |
Part 3 — Reports
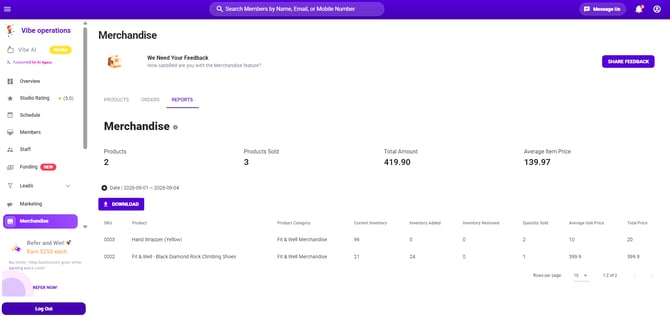
The Reports tab summarises merchandise performance for a selected date range.
Summary figures across the top:
- Products — number of distinct products sold in the period
- Products Sold — total units sold
- Total Amount — total sales value
- Average Item Price
Filtering by date
- Click the Date | YYYY-MM-DD ~ YYYY-MM-DD chip.
- In the Filter by Date panel, set the Date Range.
- Click APPLY.
The summary figures and the table below both update to the selected range.
Detail table columns: SKU · Product · Product Category · Current Inventory · Inventory Added · Inventory Removed · Quantity Sold · Average Unit Price · Total Price
Click DOWNLOAD to export the report.
O