
Before you start, make sure you have already set up your Classes, Locations and (if applicable) Appointments, since every package must be linked to at least one class.
Navigate to Configure → Package Options, then click Add Package.
Studio-wide rules such as trial eligibility, failed payment behaviour and booking windows are set under the General Settings tab, not in this form.
Recurring-specific settings are covered in Step 9
- Step 1: Choose the package type
- Step 2: Name and describe your package
- Step 3: Set your price and credits
- Step 4: Set eligibility, package category & trial
- Step 5: Package validity
- Step 6: Advanced Options — reminders and day/time restrictions
- Step 7: Booking, purchase and group limits
- Step 8: Sharing and fees
- Step 9: Recurring package settings
Step 1: Choose the package type
At the top of the form you'll see the Recurring Option toggle.
| Toggle | Use it for |
|---|---|
| Off — One time package | Class packs, trial passes, drop-ins, prepaid bundles. The member pays once and the package runs until it expires or the credits are used up. |
| On — Recurring package | Monthly or subscription memberships. The member is billed automatically each cycle until they cancel. |
Set this before filling in the rest of the form — turning it on adds several extra fields and disables package sharing.
Recurring-specific settings are covered in Step 9
Step 2: Name and describe your package
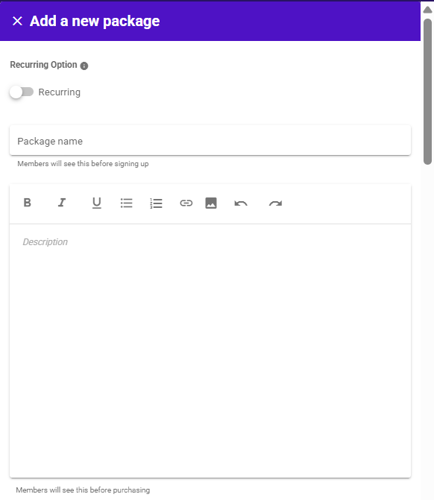
- Package name — this is what members see before signing up. Keep it short and recognisable, e.g. 10-Class Pack or Unlimited Monthly.
- Duplicate names are not allowed
- Special characters are not allowed
- Description — members see this before purchasing, so use it to explain what's included, any restrictions, and who the package suits. The editor supports bold, italic, underline, bullet and numbered lists, links and images.
Step 3: Set your price and credits
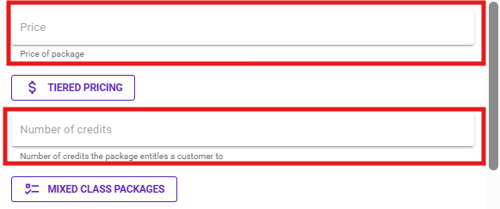
Price — the amount the member pays. For recurring packages, this is the amount charged each cycle.
Tiered Pricing — click to set different prices for the same package, for example a corporate rate or a student rate. COMING SOON
Number of credits — how many credits the package gives the member.
- As a general rule, 1 credit = 1 class
- For unlimited memberships, enter a high number such as
999
Mixed Class Packages — click to allocate credits across different class types within a single package, for example 5 Reformer credits and 5 Mat credits in one purchase. COMING SOON
Step 4: Set eligibility, package category & trial
Still in the same section, decide where and what the package can be used for: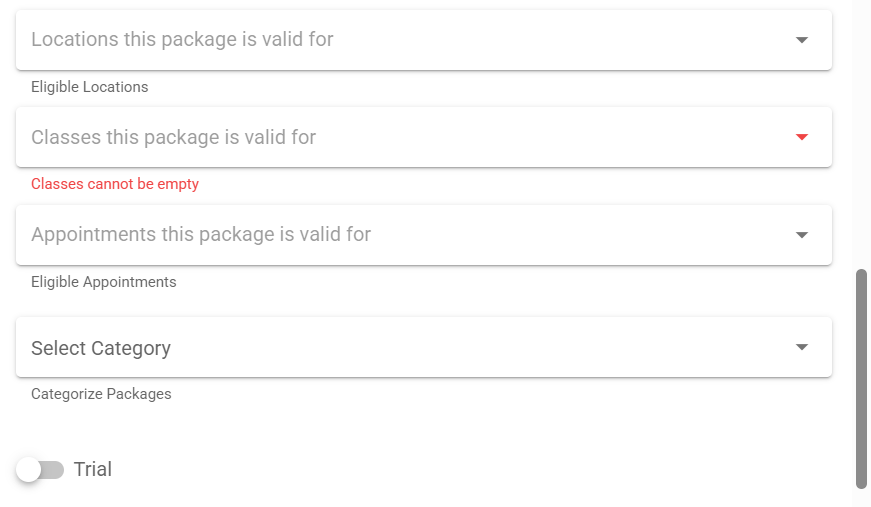
- Locations this package is valid for — required. Select "All Existing And Future Locations" to allow all locations, or select specific venues.
- Classes this package is valid for — required. Select "All Existing And Future Classes" to allow all classes, or select specific classes. Package cannot be saved without at least one class selected.
- Appointments this package is valid for — Select "All Existing And Future Appointments" to allow all appointments, or select specific appointment sessions. Select if the package can also be redeemed against 1-to-1 or appointment-based sessions.
- Select Category — groups the package on your booking website so members can find it more easily, e.g. Memberships, Intro Offers. Categories are managed via the Manage Categories button on the Package Options page.
- Select Category — groups the package on your booking website so members can find it more easily, e.g. Memberships, Intro Offers. Categories are managed via the Manage Categories button on the Package Options page.
Trial
Switch on Trial to mark this package as an intro offer. How many trials a new member can buy is controlled by the Trial Package Rules setting under General Settings.
Step 5: Package validity
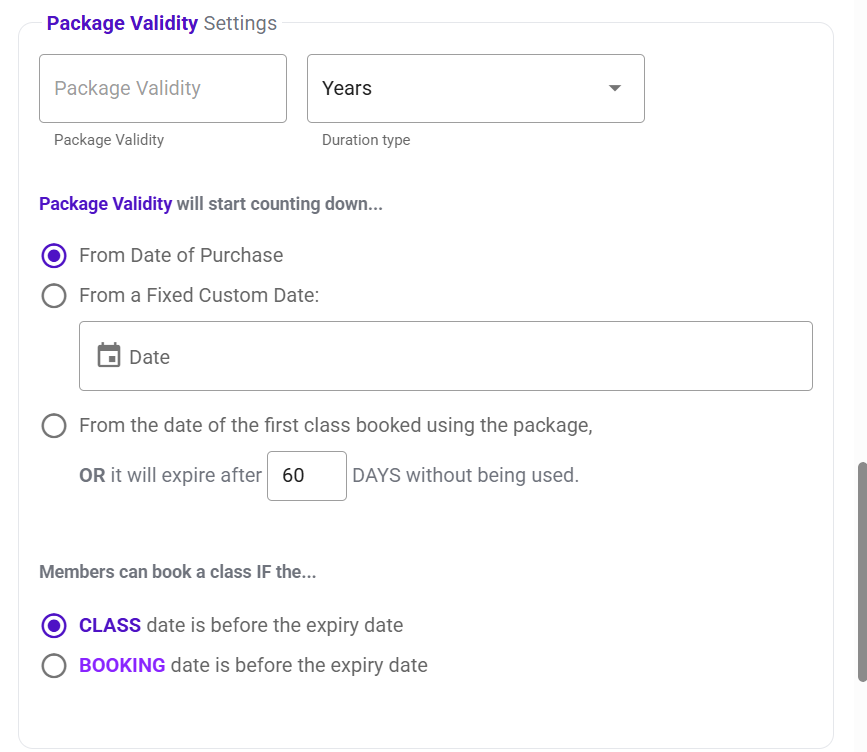
Package Validity
Enter a number and choose a Duration type (Days, Weeks, Months or Years). Note that 1 month is counted as 30 days.
When the countdown starts
| Option | What happens |
|---|---|
| From Date of Purchase | The package activates immediately. A package bought on 1 January starts counting down on 1 January. |
| From a Fixed Custom Date | The package activates on a date you choose. Useful for pre-sales — members can buy now, but the package only becomes usable from the date you set. |
| From the date of the first class booked | The countdown starts when the member books their first class. Set the number of days in the OR it will expire after ___ DAYS without being used field — if they haven't booked by then, the package expires automatically. This encourages members to start using what they've bought. |
Booking rules at expiry
| Option | What happens |
|---|---|
| CLASS date is before the expiry date | The class itself must fall before expiry. If the package expires 30 June, no July classes can be booked. |
| BOOKING date is before the expiry date | Only the booking has to happen before expiry. A member can book a July class on 29 June and still attend it, even though the package has expired by then. |
Step 6: Advanced Options — reminders and day/time restrictions
Click Advanced Options to expand this section. Everything here is optional.
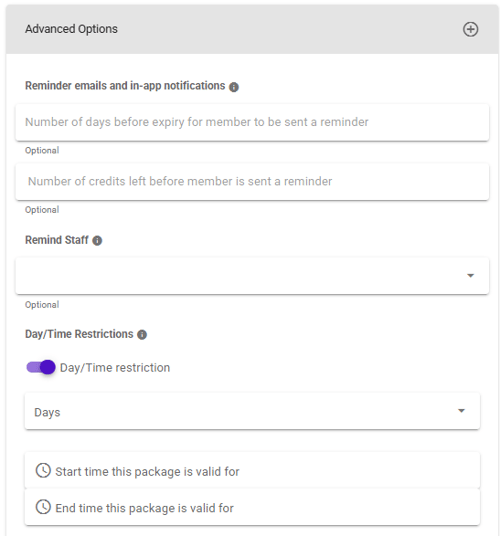
Reminder emails and in-app notifications — prompt members to renew before they run out:
- Number of days before expiry — send a reminder a set number of days before the package expires
- Number of credits left — send a reminder once the member drops to a set number of credits
Remind Staff — select staff members to receive the same reminders, so your team can follow up on renewals directly.
Day/Time Restrictions — switch on to limit when the package can be used. Select the applicable Days, then set a start time and end time. This is how you create off-peak or weekday-only packages priced differently to your full-access options.
Step 7: Booking, purchase and group limits
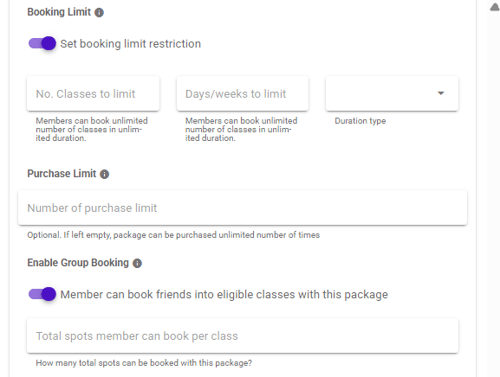
Booking Limit — caps how many classes a member can book within a set period. Left off, members can book an unlimited number of classes. Set the number of classes, the number of days or weeks, and the duration type — for example, 2 classes per day. This is mainly used to keep unlimited memberships sustainable.
Purchase Limit — how many times a single member can buy this package. Once they hit the limit, the package is hidden from them. Leave blank for unlimited purchases. Useful for trial and promotional packages you only want each member to use once.
Enable Group Booking — lets a member book friends into eligible classes using their own package. Set Total spots member can book per class to cap how many spots one booking can take.
Step 8: Sharing and fees
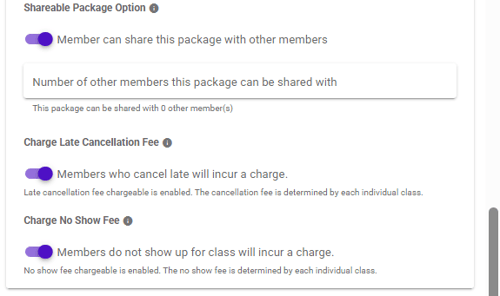
Shareable Package Option — allows a member to share their package with other members. Set how many other members it can be shared with. All sharing members need a Vibefam account. Packages can be shared by members through the app or website, or by an admin after purchase.
Charge Late Cancellation Fee — members who cancel after your cancellation window will be charged. The fee amount is set on each individual class, not here.
Charge No Show Fee — members who don't turn up will be charged. Again, the amount is set per class.
When you're done, click Submit. Nothing is saved until you do.
Step 9: Recurring package settings
If you switched Recurring on in Step 1, these additional settings appear at the top of the form.
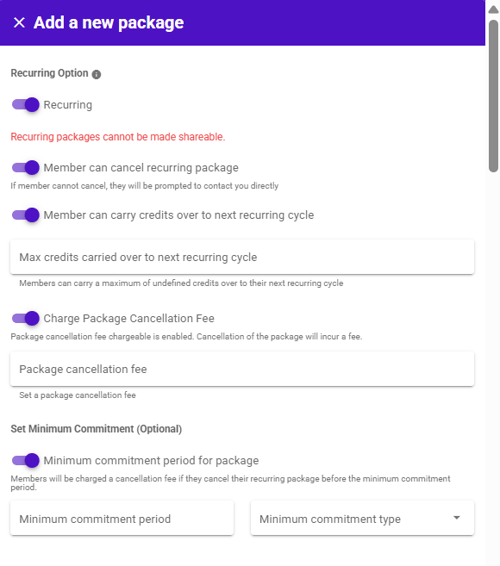 Member can cancel recurring package — when on, members can cancel their own membership from the app or website. When off, they'll be prompted to contact your studio directly, giving you the chance to save the membership.
Member can carry credits over to next recurring cycle — unused credits roll into the next cycle instead of being lost. Set Max credits carried over to cap how many. Leave the toggle off if credits should reset each cycle.
Charge Package Cancellation Fee — charge a fee when a member cancels their membership. Enter the amount in the Package cancellation fee field.
Set Minimum Commitment — require members to stay for a minimum period, e.g. 3 months. If they cancel before the commitment period ends, they are charged the cancellation fee above. Set the minimum commitment period and the commitment type (the unit of time).